
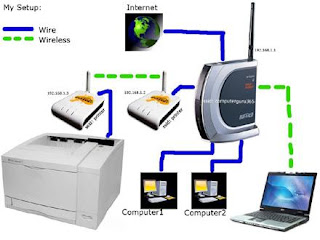
Connecting your inkjet printer to a wireless network will let you share the printer with many different computers without the hassle of tangled cables and connectors. Follow these steps make the connection.
Step 1
Check if your printer is network ready. Many newer models are designed to work on networks. Examine the documentation to see if your printer supports Wi-Fi (802.11x) or Bluetooth.
Step 2
Add network support to your printer. If your printer is not already wireless you can connect it to a wireless router using the RJ-45 Jack (it resembles a large telephone jack). You can also buy an expansion card that will add a jack or buy an external print server that will connect to the USB or parallel port.
Step 3
Connect your printer to the network. If your printer is not wired, you’ll have to connect it directly to your wireless router. Connect a networking cable from the RJ-45 Jack on the printer (or adapter) to the router. Plug it into any jack except the UPLINK. The printer should automatically connect to the network when turned on.
Step 4
Install printer drivers on all computers. Using the disc that came with the printer or drivers downloaded from the manufacturer, install the printer’s drivers onto each computer on the network.
Step 5
Print. You should be able to access the printer just like any other wireless device. Select the printer from the Print menu when you print.
Step 1
Install the printer. Set up the printer as normal on a machine that is already connected to the wireless network. Connect all necessary cables and install all necessary drivers.
Step 2
Open the printers and faxes folder. Click "Start," then "Control Panel," then "Printers and Other Hardware" and then "Printers and Faxes."
Step 3
Share your printer. Find the icon for the printer you just installed. Click the icon once and then select SHARE THIS PRINTER in the tasks pane on the left. Now, right click the icon, select properties and go to the SHARING tab. Click "Share Name," and then click "Okay."
Step 4
Connect to the printer. On the other computers within the network, open the control panel and click "Printers and Other Hardware." Select "Add a Printer."
Step 5
Select "Printer Connection." When prompted, select this option instead of the local printer. Find and select the printer you just installed and select it.
Step 6
Print as normal. Next time you print a page, send it to your networked printer.


1 comments:
Thanks for sharing very useful information.If your looking for HP Deskjet 3512 Wireless Setup with in 5 minutes then Pre PC Solution is the best Printer Solution Provider Company which is helpful to solve your problems in very short time contect us for out best services.
Printer Setup, H.P Printer
Post a Comment
Post a Comment